Deploying scripts on Jamf Pro is very common, but I found we lack versioning, rollback and team work on that part. As I was looking for a way to use Github as a version control tool, there was a session about this subject in VJNUC 2021.
I also found this post, describing exactly what I wanted to do. As it’s in Japanese and as I also did some additions to this, I wanted to share my implementation. All kudos should go to the original post.
Prerequisites
Creation of a dedicated user in Jamf
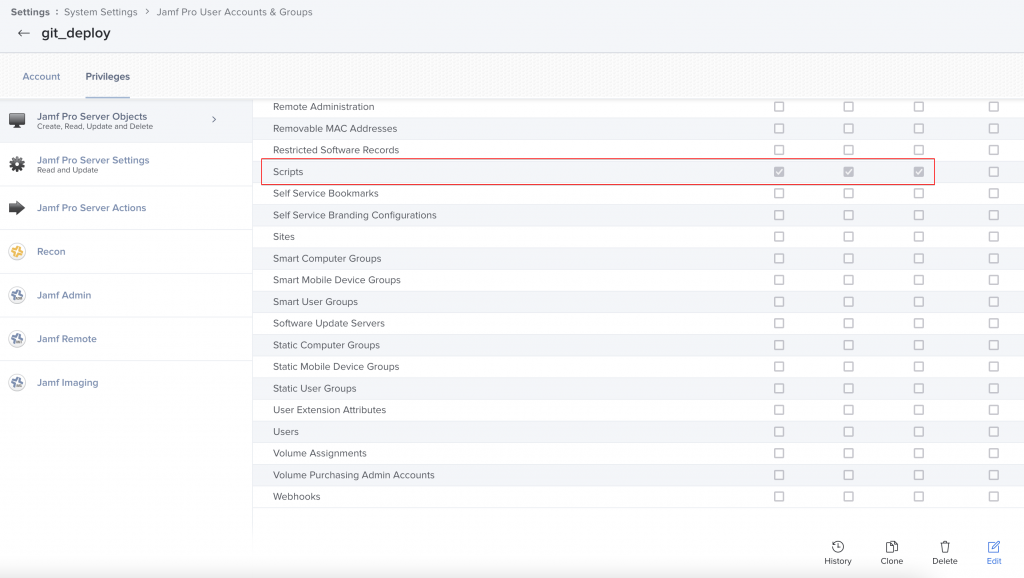
For security concerns, I prefer to create a user dedicated only for the deployment purpose, with very limited rights.
In the Jamf Console, create a new user with just the rights to Create, Read and Update scripts.
Github repository configuration
Now, we will setup the repository in GitHub.
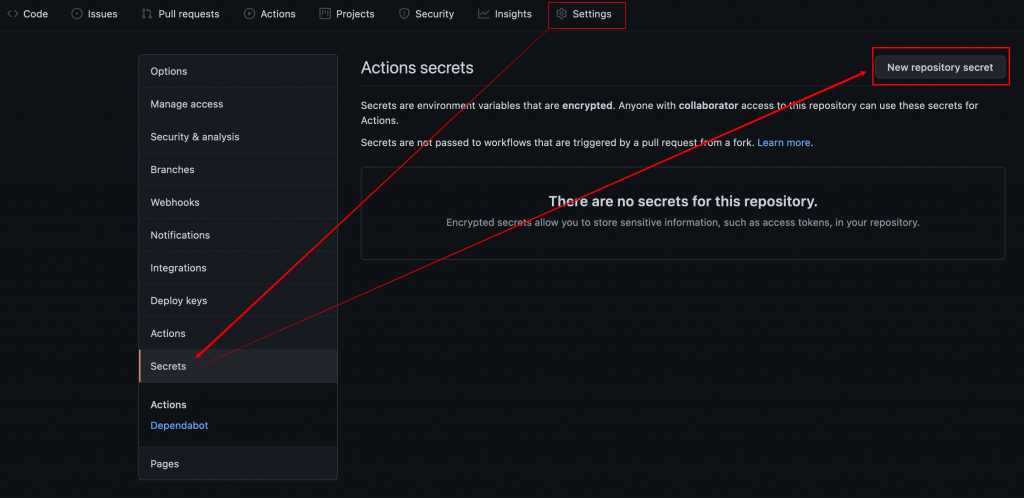
First, you’ll have to add the password of the user you’ve just created as a secret in Github. In your repository, go in Settings, then Secrets and click on New repository secret.
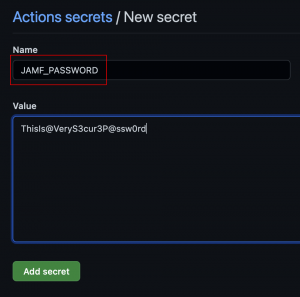
Now, create a secret called JAMF_PASSWORD. It will be used in the scripts later. Enter the password and click on Add secret.
Folder structure
On your computer, clone the repository, and then create the files and folders, following this structure :
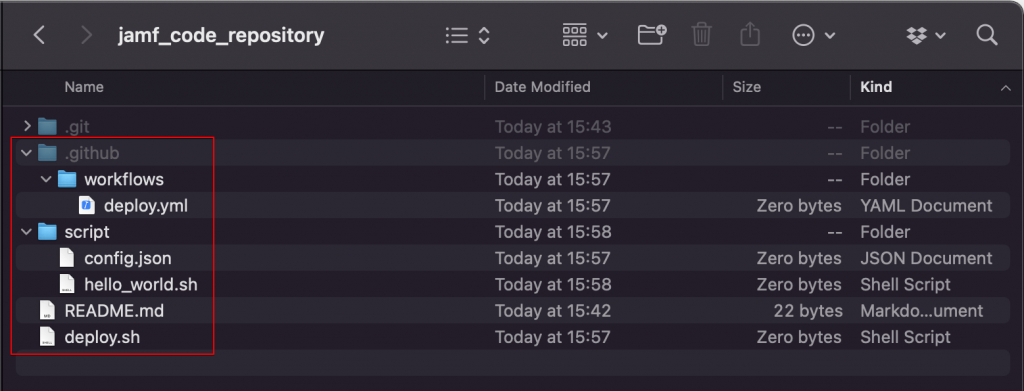
The .git folder is automatically created. To display and create hidden folders, press Cmd + Shift + . (period)
Let’s see what’s the purpose of each file :
- deploy.yml : This file contains the configuration for GitHub Actions. You’ll define the different actions to perform, the environment variables to use or the notifications to send for example.
- config.json : Here, we will define the different options of our deployment. Is it a new script or an update of an existing script, what is the category where the script is located, what are the different parameters and so on.
- hello_world.sh : This is the script we want to deploy
- deploy.sh : The core of this automation. This script will do all the API calls to upload the script in the Jamf console.
File contents
deploy.yml
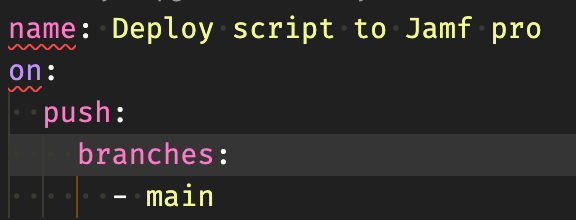
So this file will defile all the different actions GitHub will need to perform for our deployment. Here is an example :
name: Deploy script to Jamf pro
on:
  push:
    branches:
      - main
jobs:
  deploy:
    runs-on: macos-11
    steps:
    - uses: actions/checkout@v2
    - name: install GNU sed
      run: brew install gnu-sed
    - name: Grant execute permission
      run: chmod +x deploy.sh
    - name: Deploy
      env:
        JAMF_URL: "https://jamfinstance.jamfcloud.com"
        JAMF_USER: "git_deploy"
        JAMF_PASSWORD: ${{ secrets.JAMF_PASSWORD }}
      run: sh deploy.sh
We tell GitHub to deploy on each push on branch main. Change that if you want to do it on another branch or another action.
Then the jobs section describes what we want to do. Some environment variables are defined, change the JAMF_URL to your Jamf instance URL. The password has been securely stored in the GitHub secrets before.
config.json
Now, we will define the settings of our script in the Jamf console. Let’s see the content of the file.
{
"mode": "NEW",
"id": "",
"name": "< Generate dynamically >",
"info": "Just a simple Hello to the world.",
"notes": "< Generate dynamically >",
"priority": "AFTER",
"categoryId": "15",
"categoryName": "",
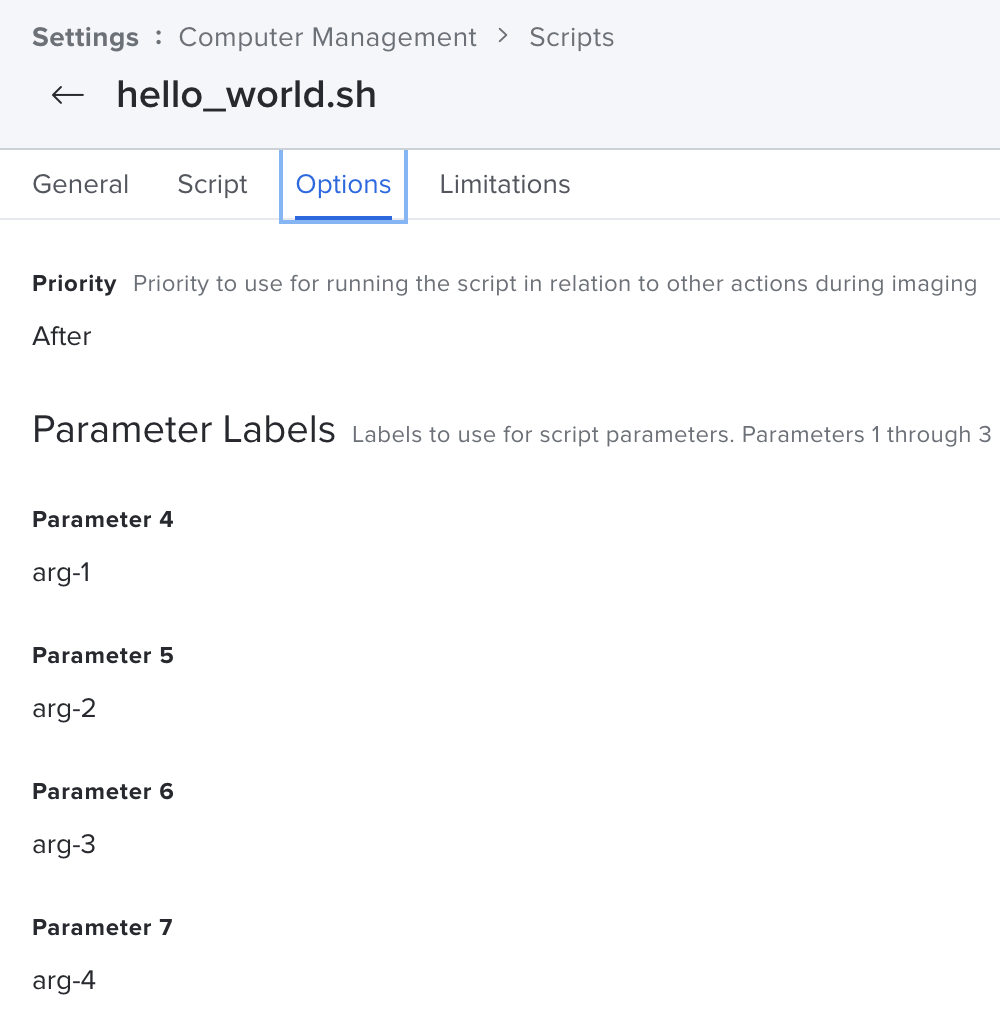
"parameter4": "arg-1",
"parameter5": "arg-2",
"parameter6": "arg-3",
"parameter7": "arg-4",
"parameter8": "arg-5",
"parameter9": "arg-6",
"parameter10": "arg-7",
"parameter11": "arg-8",
"osRequirements": "10.15.x",
"scriptContents": "< Generate dynamically >"
}
- mode : Can be NEW or UPDATE. It’s pretty self explanatory, just don’t forget to modify it before pushing to avoid duplicates.
- id : Keep it blank with the NEW mode. If you UPDATE a script, put the id of the script.
The next fields are used to fill the Jamf console.
- name : The name of the script.
- General > Display Name
- info : Useful informations about the script, like the usage, date of creation…
- General > Informations
- notes : Here, the script will put the commit link generated automatically.
- General > Notes
- priority : Can be AFTER or BEFORE.
- Options > Priority
- categoryId : The category id where the script belongs.
- Not displayed in console, used only by the script.
- categoryName : The category name where the script belongs.
- General > Category
- parameterX : The labels to display for each parameter
- Options > Parameters labels
- osRequirements : The minimum OS version to run the script
- Limitations > Operating System Requirement
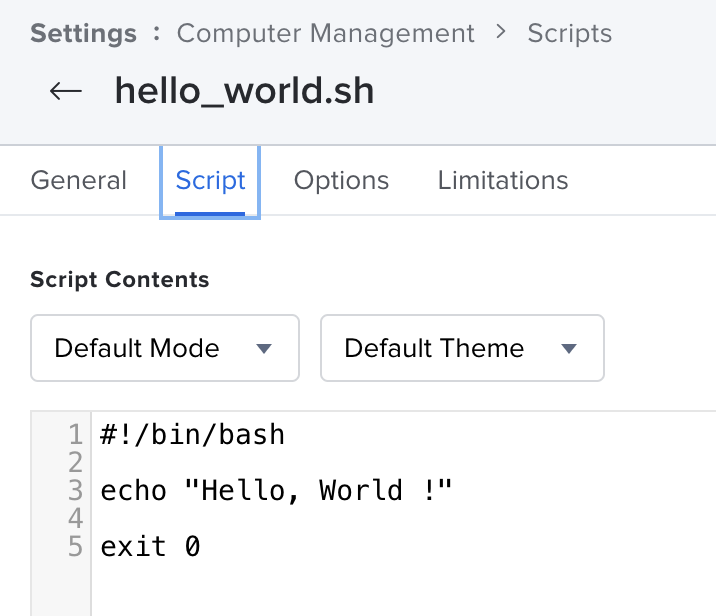
- scriptContents : The script you want to push in the console.
- Script > Script contents
deploy.sh
This is the core of the deployment tool. It will parse the config.json, and push the appropriate values in Jamf console using API.
#!/bin/bash

# server connection information
URL=$JAMF_URL
username=$JAMF_USER
password=$JAMF_PASSWORD

# created base64-encoded credentials
encodedCredentials=$( printf "${username}:${password}" | /usr/bin/iconv -t ISO-8859-1 | /usr/bin/base64 -i - )

# generate an auth token
authToken=$( /usr/bin/curl "$URL/api/v1/auth/token" \
--silent \
--request POST \
--header "Authorization: Basic $encodedCredentials" \
--header "Content-Length: 0" )

# parse authToken for token, omit expiration
token=$( awk -F \" '{ print $4 }' <<< "$authToken" | xargs )

# set config
FILENAME=$(basename ./script/*.sh)
CONTENTS=$(cat ./script/$FILENAME | sed -e 's/"/\\"/g' | gsed -z 's/\n/\\n/g' )
conf_info=$(cat ./script/config.json | jq .info | sed -e 's/^"//' -e 's/"$//' )

#conf_notes=$(cat ./script/config.json | jq .notes | sed -e 's/^"//' -e 's/"$//' )
conf_notes="${GITHUB_SERVER_URL}/${GITHUB_REPOSITORY}/commit/${GITHUB_SHA} \n- GitHub Actions Run Number: #${GITHUB_RUN_NUMBER}"
conf_priority=$(cat ./script/config.json | jq .priority | sed -e 's/^"//' -e 's/"$//' )
conf_categoryId=$(cat ./script/config.json | jq .categoryId | sed -e 's/^"//' -e 's/"$//' )
conf_categoryName=$(cat ./script/config.json | jq .categoryName | sed -e 's/^"//' -e 's/"$//' )
conf_param4=$(cat ./script/config.json | jq .parameter4 | sed -e 's/^"//' -e 's/"$//' )
conf_param5=$(cat ./script/config.json | jq .parameter5 | sed -e 's/^"//' -e 's/"$//' )
conf_param6=$(cat ./script/config.json | jq .parameter6 | sed -e 's/^"//' -e 's/"$//' )
conf_param7=$(cat ./script/config.json | jq .parameter7 | sed -e 's/^"//' -e 's/"$//' )
conf_param8=$(cat ./script/config.json | jq .parameter8 | sed -e 's/^"//' -e 's/"$//' )
conf_param9=$(cat ./script/config.json | jq .parameter9 | sed -e 's/^"//' -e 's/"$//' )
conf_param10=$(cat ./script/config.json | jq .parameter10 | sed -e 's/^"//' -e 's/"$//' )
conf_param11=$(cat ./script/config.json | jq .parameter11 | sed -e 's/^"//' -e 's/"$//' )
conf_osRequirements=$(cat ./script/config.json | jq .osRequirements | sed -e 's/^"//' -e 's/"$//' )

# create json data
jsonData=$(cat <<EOS
{
  "name": "${FILENAME}",
  "info": "${conf_info}",
  "notes": "${conf_notes}",
  "priority": "${conf_priority}",
  "categoryId": "${conf_categoryId}",
  "categoryName": "${conf_categoryName}",
  "parameter4": "${conf_param4}",
  "parameter5": "${conf_param5}",
  "parameter6": "${conf_param6}",
  "parameter7": "${conf_param7}",
  "parameter8": "${conf_param8}",
  "parameter9": "${conf_param9}",
  "parameter10": "${conf_param10}",
  "parameter11": "${conf_param11}",
  "osRequirements": "${conf_osRequirements}",
  "scriptContents": "${CONTENTS}"
}
EOS
)

echo "=== jsonData ==="
echo $jsonData

# deploy

MODE=$( cat ./script/config.json | jq .mode | sed -e 's/^"//' -e 's/"$//' )
case "$MODE" in
  "NEW")
    httpResponse=$( curl "$URL/api/v1/scripts" \
    --silent \
    --request POST \
    --header "Authorization: Bearer $token" \
    --header "Accept: application/json" \
    --header "Content-Type: application/json" \
    --data "$jsonData" )

    echo "=== POST /api/v1/scripts ==="
    echo $httpResponse
  ;;
  "UPDATE")
    scriptId=$( cat ./script/config.json | jq .id | sed -e 's/^"//' -e 's/"$//' )

    # back up
    httpResponse=$( curl "$URL/api/v1/scripts/$scriptId" \
    --silent \
    --request GET \
    --header "Authorization: Bearer $token" )

    echo "=== GET /api/v1/scripts/$scriptId ==="
    echo $httpResponse

    httpResponse=$( curl "$URL/api/v1/scripts/$scriptId" \
    --silent \
    --request PUT \
    --header "Authorization: Bearer $token" \
    --header "Accept: application/json" \
    --header "Content-Type: application/json" \
    --data "$jsonData" )

    echo "=== PUT /api/v1/scripts/$scriptId ==="
    echo $httpResponse
  ;;
  *)
    echo "\$MODE is invalid value."
    exit 1
  ;;
esac

# expire the auth token
/usr/bin/curl "$URL/api/v1/auth/invalidate-token" \
--silent \
--request POST \
--header "Authorization: Bearer $token" \
--header "Content-Length: 0"
I’ve modified the code from the original post so now it uses the Jamf Pro API. I also added a Token invalidation once everything is done.
hello_world.sh
This is the script we want to push to Jamf console. We will use here the most basic example.
#!/bin/bash

echo "Hello, World !"

exit 0
First deployment
We are now ready to deploy our script for the first time. After pushing all the files to GitHub, here is what we get :
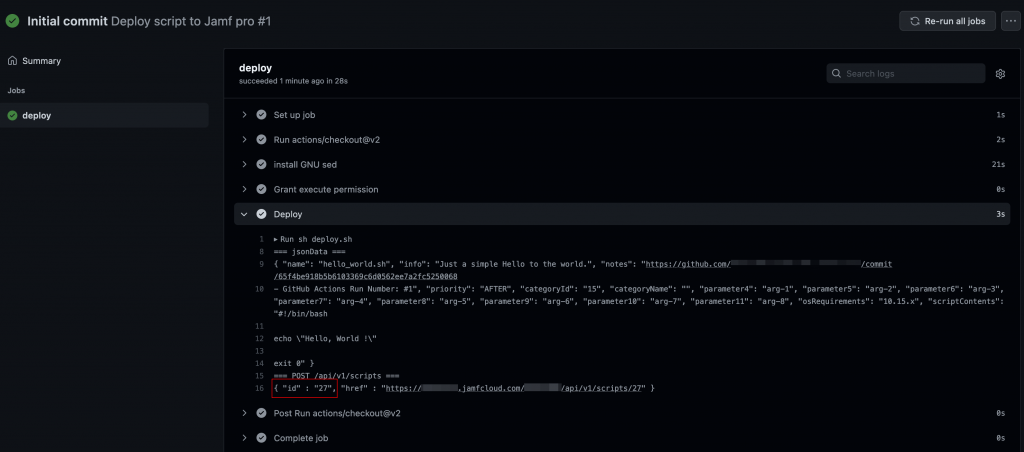
The script has been deployed with the id 27. Let’s check in the Jamf console.
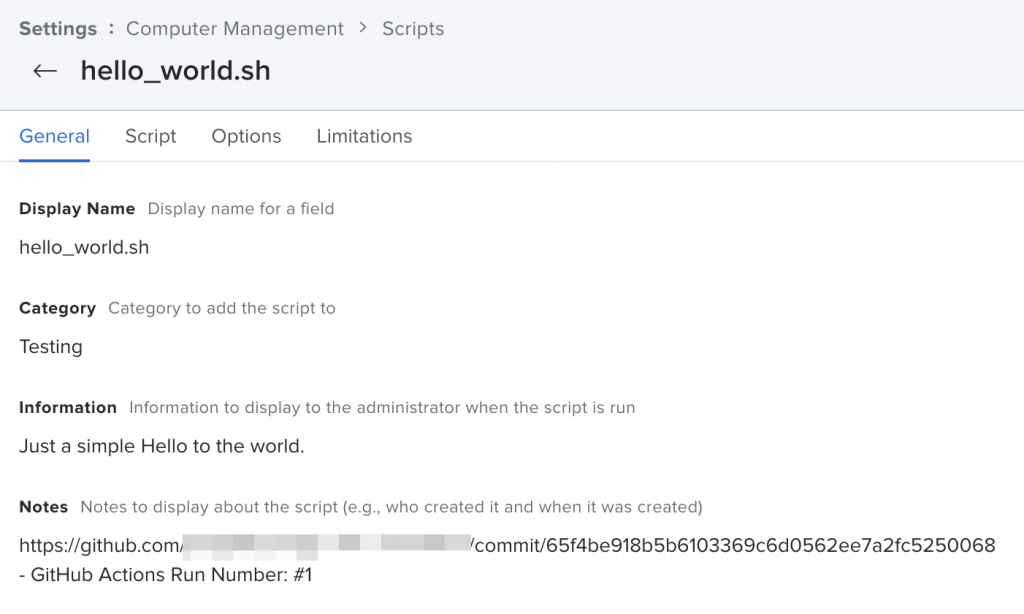
All the settings have been successfully pushed in the Jamf console. In the notes, you have the commit link.
But now, let’s see if we modify the script.
Updating the script
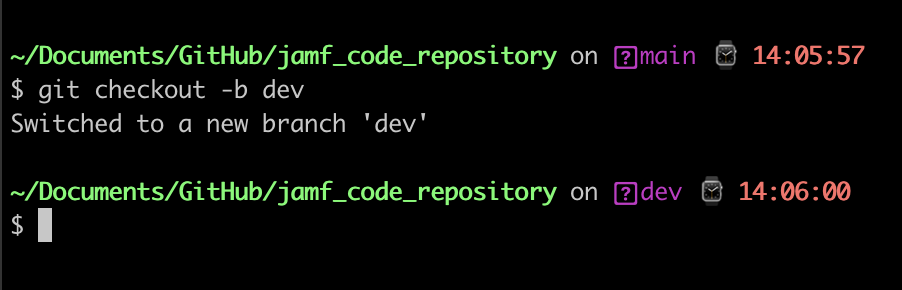
Now, let’s say we update the script. First, we need to move to a new « dev » branch on GitHub.
git checkout -b dev
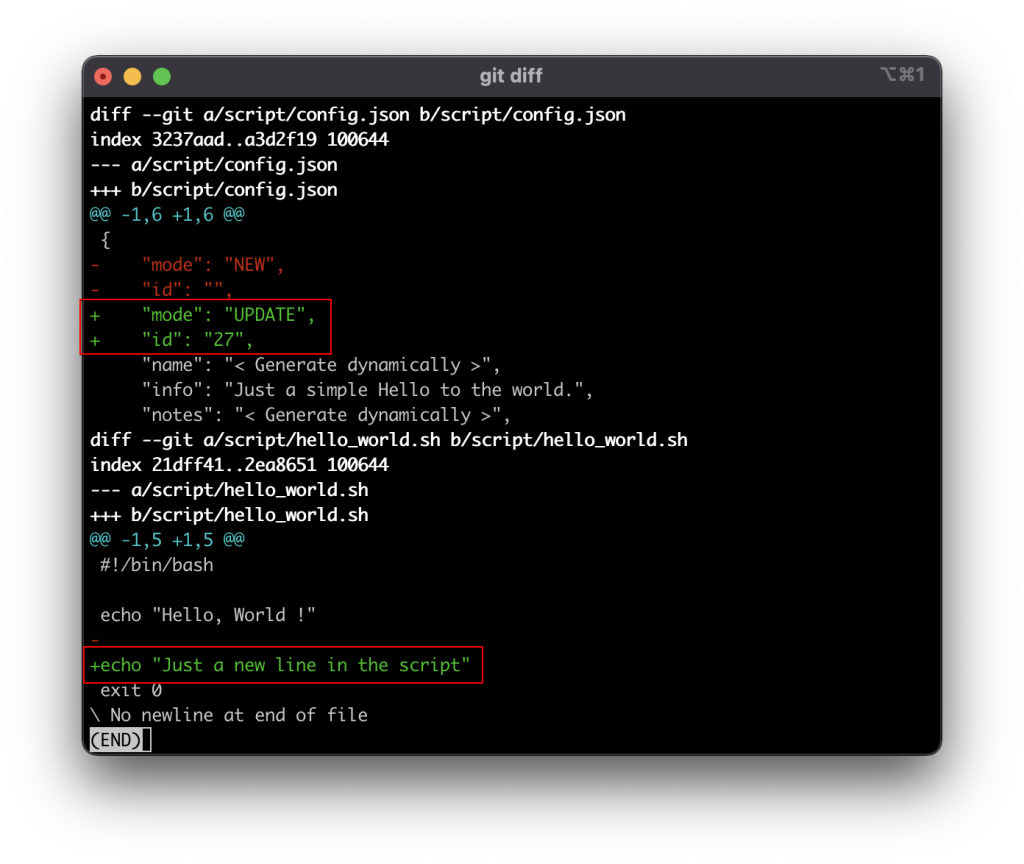
We can modify the script, but also the config.json file.
We switch the mode from NEW to UPDATE and add the id of the script, in our example, it’s 27.
You can see what has been modified with
git diff
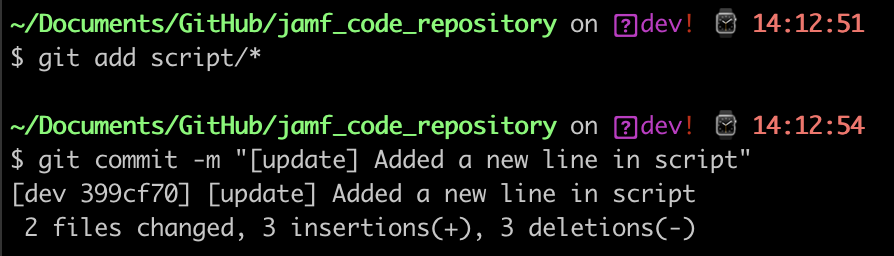
We add all files in the script folder before the commit.
git add script/*
git commit -m "[update] Added a new line in script"
Finally, we can push that code.
git push --set-upstream origin dev
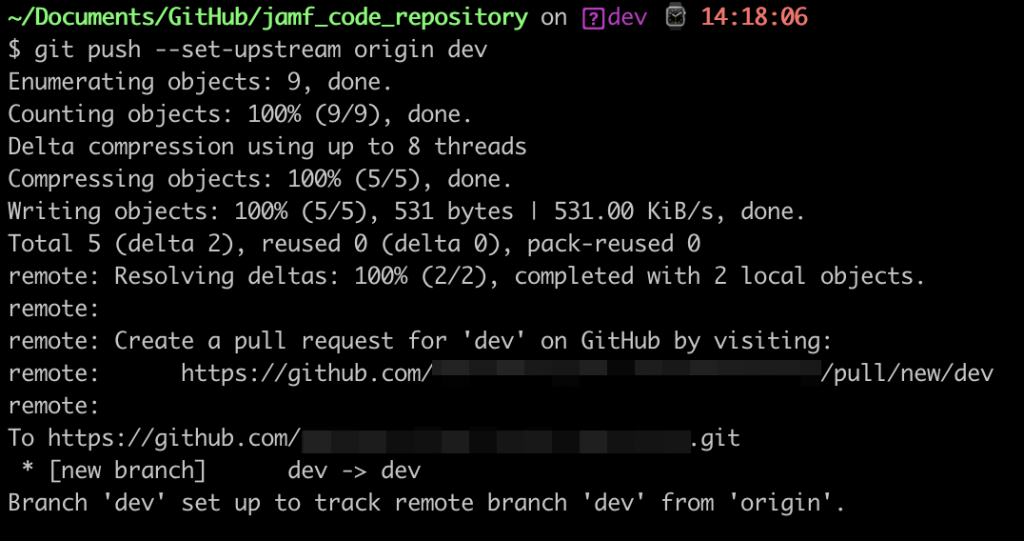
If we go on GitHub, the actions are not triggered. Remember the deploy.yml file ? We set in it to deploy only when a push on main branch happens :
What you have to do is a Pull Request. If you work in a team, it’s good to proceed like this, allowing other people to approve the change and do code review.
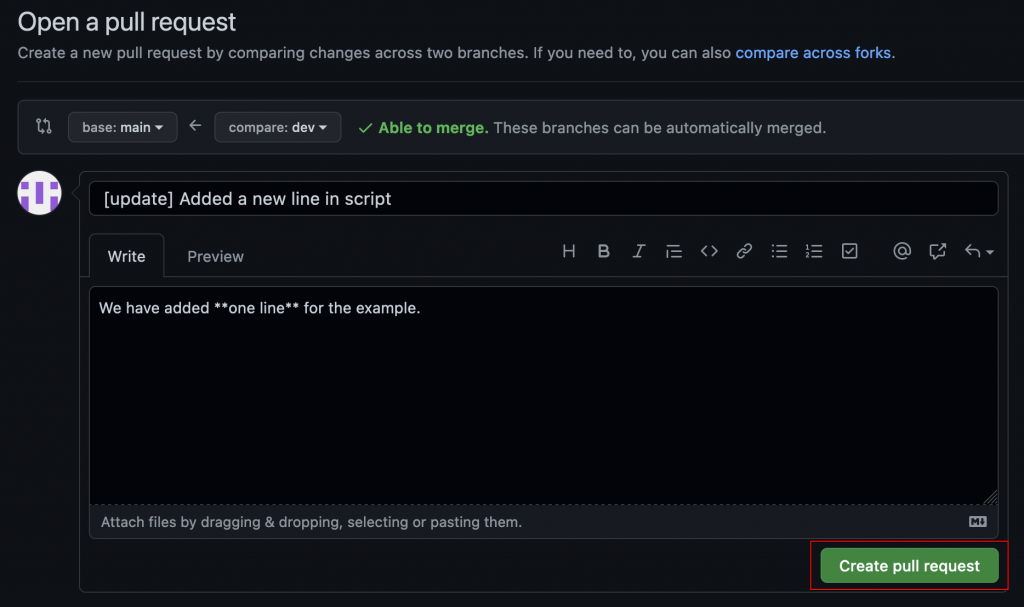
Go on GitHub site, click on Pull Requests, and on Compare & pull request.

Describe the change and press Create pull request.
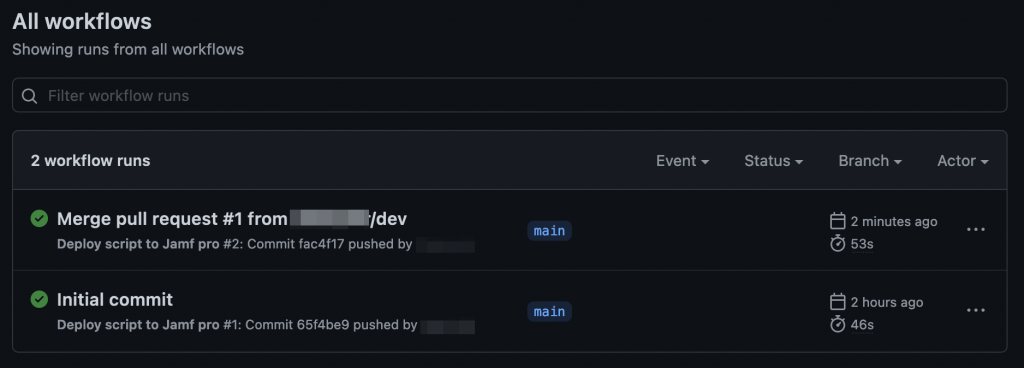
If everything is fine, the Pull Request will be merge to the main branch.

The deploy is triggered in the Actions tab.
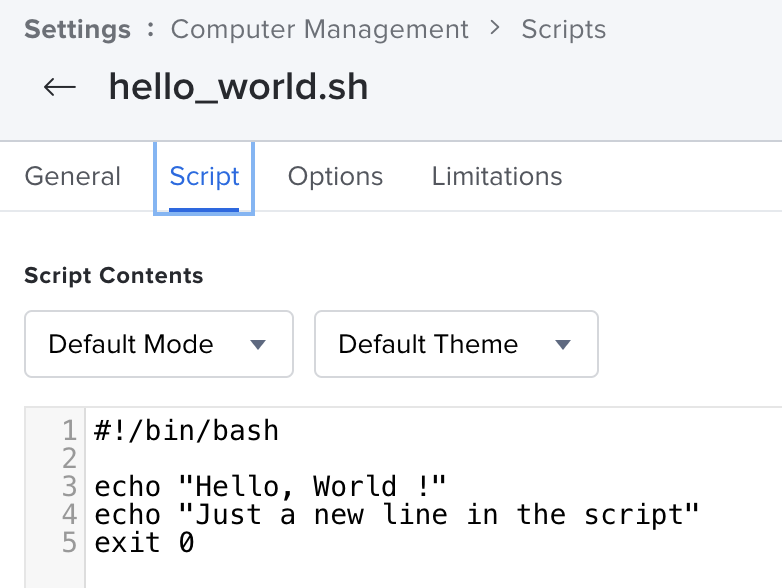
And the Jamf console has received the updated script.
Some tips
In the README.md file, I’ve added a status badge. It looks like this on the GitHub homepage :
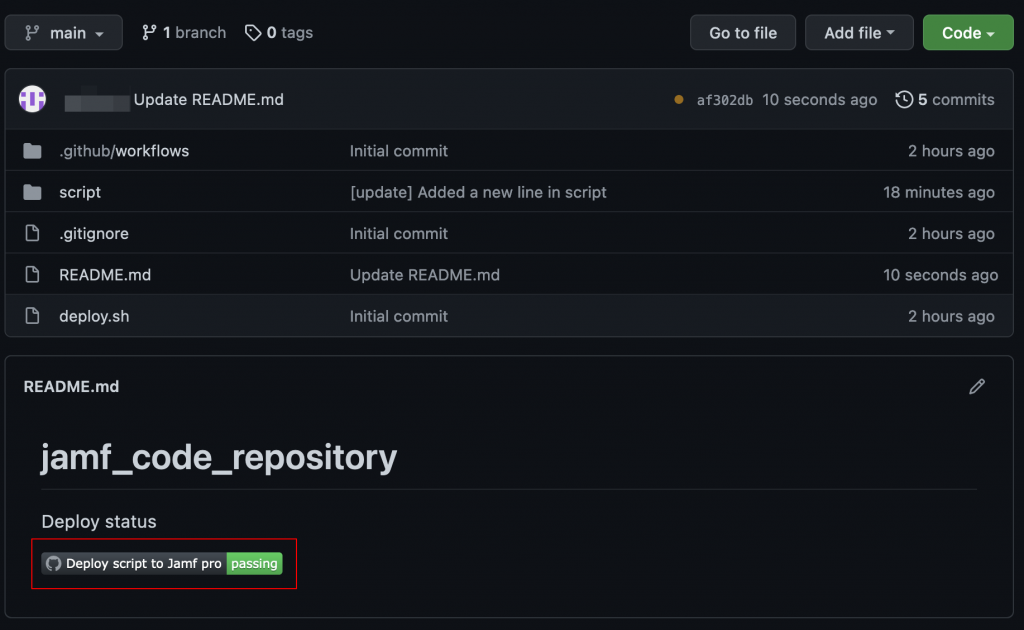
Just add this line in the README.md, and replace USERNAME and REPOSITORY by your values.

We’re trying to do exactly this in our Jamf. i’ve tested this guide but get an error when it gets to around line 79-80 « echo « === POST /api/v1/scripts === » echo $httpResponse »
my output is this in Github:
{
« httpStatus » : 401,
« errors » : [ ]
}
It seems to be a authentication error but I know that this user works and can create scripts in Jamf.
I believe some endpoints have been depreciated in the classic Jamf API: (https://developer.jamf.com/jamf-pro/docs/privileges-and-deprecations).
I thought it could possible be a token issue then and discovered that « /auth/tokens » was been depreciated in 2020-06-01.
So I changed that entry in the deploy.sh script to /v1/auth/token but still get the same 401 error.
Would you have a solution to this error or maybe an updated deploy script with the new Jamf Pro API (uapi)?
You’re totally right, these endpoints are either deprecated or modified. Same for the token generation. I’ll update the script quickly 🙂
In the meantime, here is what I use to generate a token on my up-to-date scripts :
jamfProUser="$4"

jamfProPassEnc="$5"

jamfProSalt="$6"

jamfProPassPhrase="$7"
jamfProPass=$(echo "$jamfProPassEnc" | /usr/bin/openssl enc -aes256 -md md5 -d -a -A -S "$jamfProSalt" -k "$jamfProPassPhrase")
echo "Connecting to $jamfProURL"
# created base64-encoded credentials
encodedCredentials=$(printf "${jamfProUser}:${jamfProPass}" | /usr/bin/iconv -t ISO-8859-1 | /usr/bin/base64 -i -)
# generate an auth token
authToken=$(/usr/bin/curl "$jamfProURL/api/auth/tokens" \
--silent \
--request POST \
--header "Authorization: Basic $encodedCredentials" \
--header "Content-Length: 0" \
-w "\n%{http_code}")
httpCode=$(tail -n1 <<<"${authToken}") httpBody=$(sed '$ d' <<<"${authToken}") echo "Command HTTP result : ${httpCode}" echo "Response : ${httpBody}" if [[ ${httpCode} == 200 ]]; then echo "Token creation done" else echo "[ERROR] Unable to create token. Curl code received : ${httpCode}" exit 1 fi # parse authToken for token, omit expiration token=$(awk -F \" '{ print $4 }' <<<"$authToken" | xargs)
To generate the encoded password and salt, use this : EncryptedStrings
Script has been updated and tested successfully
Please help, I still get a 401. I have confirmed they username and password works in the script and a token is generated. But when I run the job I get the following.
exit 0
13
» }
14
=== POST /api/v1/scripts ===
15
{ « httpStatus » : 401, « errors » : [ ] }
16
{
17
« httpStatus » : 401,
18
« errors » : [ ]
19
}
Do you have enough privileges on your API account ? You must have the Create Scripts privileges at least. For reference, you can check here https://developer.jamf.com/jamf-pro/docs/privileges-and-deprecations.